Published October 23, 2026 · Updated November 9, 2026 · Checked by the editor against the listed sources
Before you start: This guide is general information, not medical advice. Check with your doctor or physiotherapist first if you have osteoporosis, recent surgery, a heart condition, dizziness, or pain. If you have uncontrolled high blood pressure, a heart condition, severe joint pain, or recent surgery, ask your clinician which exercises suit you before starting. Stop and get help immediately if you feel sharp pain, chest pain, or faint.
Strength training can help you stay mobile and independent after age 60, yet it is often the part of fitness people skip. Heavy weights and gym equipment can feel intimidating. Resistance bands offer a gentle, highly adaptable alternative that you can use while seated.
This guide covers 6 essential resistance band exercises targeting your upper back, arms, legs, and hips to build functional strength at home.
To see how strength training fits alongside aerobic activity, read our guide on cardio vs strength training for seniors.
What the Evidence Says About Strength Training
Public health guidelines from the World Health Organization (WHO), CDC, and Health.gov recommend that adults aged 65 and over perform muscle-strengthening activities at least 2 days each week, targeting all major muscle groups.
Muscle strength naturally declines with age, which can make standing up, walking briskly, or carrying shopping feel more demanding. Regular resistance training can help maintain muscle mass and may support bone health and balance.
Choosing and Checking Your Band
Resistance bands come in various resistance levels, usually color-coded by brand.
-
Start with light resistance: Choose a band that allows you to complete 10 to 12 repetitions with clean form, where the last two repetitions feel like focused, comfortable effort.
-
Select the right style: A flat resistance band (about 4 to 5 feet long) with or without soft handles works well. Avoid thin tubular cords if you have hand arthritis or weak grip strength.
-
Inspect before every session: Check your band for tiny nicks, tears, or thinning spots. Never use a damaged band, as it can snap unexpectedly.
-
Latex allergies: If you are sensitive to latex, choose latex-free TPE resistance bands.
What You Need and Setup
-
A sturdy chair: Use a dining chair with a firm seat placed against a wall so it cannot slide.
-
Proper footwear: Wear flat, non-slip shoes or practice barefoot on a firm floor.
-
A light flat resistance band.
-
Warm-up first: Spend 3 to 5 minutes doing easy movement before starting (see our Warm-Up Exercises for Seniors).
The 6 Resistance Band Exercises
Perform 8 to 12 repetitions of each exercise (1 to 2 sets), resting for 1 minute between sets. Move slowly and maintain steady breathing throughout.
1. Seated Band Row
-
Target muscles: Upper back (rhomboids and middle trapezius). Strengthening these muscles supports upright posture and shoulder alignment.
-
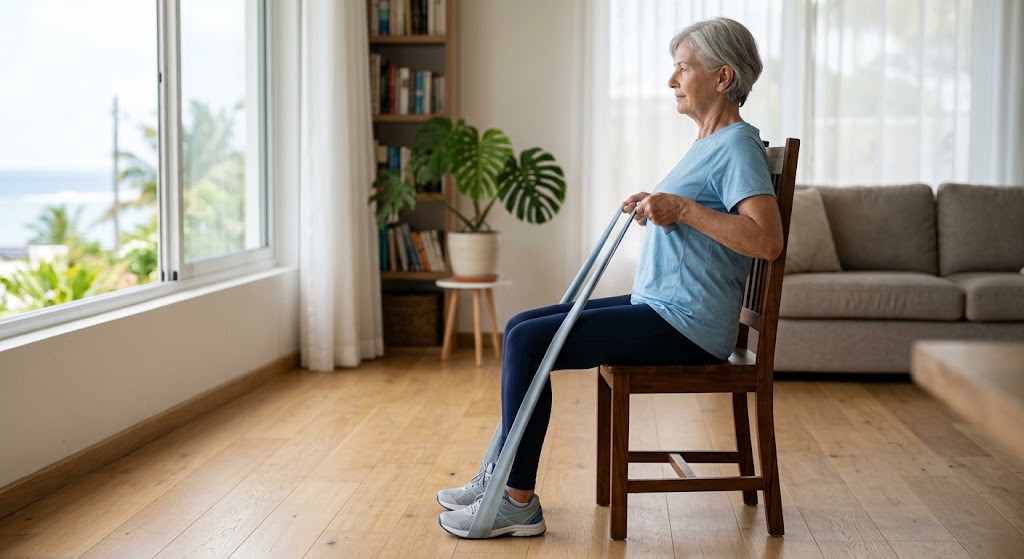
How to do it: Sit forward on your chair. Loop the middle of the band securely around the arches of both feet with your heels planted on the floor. Hold the band ends with palms facing each other. Pull your elbows back along your sides, squeezing your shoulder blades together. Slowly return to the starting position.
-
Coach’s cue: “Lead with your elbows and imagine squeezing a walnut between your shoulder blades.”
-
Reps/Sets: 8 to 12 repetitions, 1 to 2 sets.
-
Easier version: Perform the motion without a band first to practice the shoulder blade squeeze.
-
Safety check: Ensure the band is hooked firmly around the soles of your shoes so it cannot slip off. Keep the band below face height and away from your eyes, and release it if it slips.
-
How it should feel: A firm, working feeling across your mid-back.
2. Seated or Standing Biceps Curl
-
Target muscles: Biceps brachii (front upper arm). Supports lifting and carrying household objects.
-
How to do it: Sit or stand tall. Step firmly onto the middle of the band with both feet flat. Hold the ends with palms facing forward and elbows close to your ribs. Slowly bend your elbows to bring your hands toward your shoulders, then lower slowly.
-
Coach’s cue: “Keep your elbows pinned lightly against your ribs; do not let them swing forward.”
-
Reps/Sets: 8 to 12 repetitions, 1 to 2 sets.
-
Easier version: Use a lighter band, or curl only halfway.
-
Safety check: Keep your wrists straight and steady; avoid bending your wrists backward as you curl up.
-
How it should feel: Focused effort in the front of your upper arms.
3. Band Pull-Apart
-
Target muscles: Rear shoulders and upper back stabilizers. Helps counteract slouching.
-
How to do it: Sit tall in your chair. Hold the band in both hands directly out in front of your chest at shoulder height, elbows slightly soft. Breathe out as you pull your hands apart to the sides until the band lightly touches your chest. Slowly return.
-
Coach’s cue: “Keep your shoulders pulled down away from your ears as your hands move apart.”
-
Reps/Sets: 8 to 12 repetitions, 1 to 2 sets.
-
Easier version: Hold the band with a wider grip to reduce resistance.
-
Safety check: Keep the band below face height and away from your eyes, and release it if it slips. Stop if you feel pinching or sharp pain in your shoulder joints.
-
How it should feel: Mild work across the back of your shoulders and upper spine.
4. Seated Light Overhead Press
-
Target muscles: Shoulders and triceps. Supports reaching up to higher shelves.
-
How to do it: Sit tall. Anchor the center of the band under your thighs or seat, holding one end in each hand at shoulder height with palms facing forward. Breathe out as you press your hands gently upward toward the ceiling without locking your elbows. Lower slowly.
-
Coach’s cue: “Press straight up toward the ceiling while keeping your lower back pressed gently against the chair.”
-
Reps/Sets: 8 to 10 repetitions, 1 to 2 sets.
-
Easier version: Press forward at a 45-degree angle instead of straight overhead.
-
Safety check: Skip this move if raising your arms overhead causes shoulder pain.
-
How it should feel: Working effort in your shoulder muscles without lower-back strain.
5. Seated Leg Press
-
Target muscles: Quadriceps (front thighs) and glutes. Strengthens legs for standing up and stepping.
-
How to do it: Sit forward in your chair. Loop the band around the sole of one foot, holding both ends securely near your chest with your knee bent. Breathe out as you press your foot forward until your leg is nearly straight. Slowly bend your knee back to the start.
-
Coach’s cue: “Press firmly through your heel, taking 3 full seconds to return to the starting position.”
-
Reps/Sets: 8 to 12 repetitions per leg, 1 to 2 sets.
-
Easier version: Push your leg forward along the floor (a sliding motion) rather than holding it up in the air.
-
Safety check: Keep your grip on the band below chin height and make sure the band sits firmly around the arch of your foot. If it slips, let go of the band immediately. Do not lock your knee. If you have had a hip replacement, ask your surgeon first, because this move bends the hip a lot.
-
How it should feel: Clear effort in your front thigh and hip.
6. Seated Hip Abduction (Thigh Press)
-
Target muscles: Gluteus medius (outer hips). Supports pelvic stability and walking balance.
-
How to do it: Sit upright with your feet flat and close together. Use a looped mini-band, or knot a flat band loosely so it sits just above your knees without squeezing them. Gently press your knees outward against the band, hold for 2 seconds, and return slowly.
-
Coach’s cue: “Press outward evenly from both knees while keeping your feet flat on the floor.”
-
Reps/Sets: 10 to 12 repetitions, 1 to 2 sets.
-
Easier version: Perform without a band, pressing your knees outward against your own hands for light resistance.
-
Safety check: Skip this move if you have had a recent hip replacement unless cleared by your surgeon.
-
How it should feel: Targeted effort along the outer sides of your hips and seat.
Coach’s Tips
Here is how I guide clients in sessions to build strength safely with resistance bands:
Essential Form Cues
-
Control the return phase: Take 2 seconds to pull or press, and 3 full seconds to return. Controlling the band as it pulls back helps you keep control.
-
Keep shoulders relaxed: Lower your shoulder blades away from your ears before starting every set.
-
Breathe with the rhythm: Exhale on the exertion (pulling or pushing); inhale as you return.
Common Mistakes and Fixes
-
Mistake: Letting the band snap back quickly.
-
Fix: Resist the band’s pull, taking 3 full seconds to control the movement back.
-
-
Mistake: Gripping the band too tightly with white knuckles.
-
Fix: Choose a band with padded handles. If you wrap the band around your hands, keep it loose and stop if your fingers tingle or turn pale.
-
-
Mistake: Arching the lower back during presses or pulls.
-
Fix: Keep your chest lifted and your belly gently tucked inward to support your spine.
-
How I Teach It: When teaching the seated row, beginners often struggle to feel their back working because they pull only with their hands. I instruct them to pick a light band, relax their grip, and think about driving their elbows backward while squeezing an imaginary walnut between their shoulder blades.
A Simple Weekly Starter Plan
Use this progression to build strength over time:
| Weeks | Frequency | Sets and Reps | Focus |
| Weeks 1 to 2 | 2 non-consecutive days | 1 set of 8 to 10 reps | Master form using a light band |
| Weeks 3 to 4 | 2 to 3 non-consecutive days | 2 sets of 8 to 10 reps | Build movement endurance |
| Week 5 onward | 2 to 3 non-consecutive days | 2 sets of 10 to 12 reps | Move to a firmer band when comfortable |
Leave at least 1 full day between resistance sessions so your muscles can recover.
Quick Answers
Do I need to use resistance bands for all my strength work? No. Resistance bands are just one option. Bodyweight movements—like sit-to-stands—and light handheld weights are also good options.
Can I practice resistance band exercises if I have hand arthritis? Often yes, but check with your clinician if you have pain or swelling in your hands. Choose a band with padded handles. If you wrap the band around your hands, keep it loose and stop if your fingers tingle or turn pale.
How long does it take to feel stronger? Some people notice tasks feeling easier after a few weeks, but this varies from person to person.
Can I anchor a band to a door at home? Not for beginners. Every exercise here can be done without a door anchor, so we suggest skipping it.
Warning Signs: When to Stop
Stop exercising and seek emergency medical attention immediately if you notice:
-
Chest pain, tightness, or pressure.
-
Pain spreading to your jaw, neck, back, or left arm. Call your local emergency number.
-
Severe shortness of breath or feeling unable to catch your breath.
-
Dizziness, lightheadedness, or feeling faint.
-
Sudden sharp pain in any joint.
Book a visit with your doctor if you experience:
-
Joint swelling or pain that persists into the next day.
-
Muscle soreness that does not settle after 2 days of rest.
Written by Bhavna Goheeram, ISSA Elite Trainer (2023).
Sources
Medical disclaimer: This article is for general information and education only. It is not medical advice and does not replace advice from your doctor or physiotherapist. Stop any exercise and seek medical help if you feel chest pain, dizziness, sharp pain or unusual shortness of breath.

Bhavna Goheeram — Personal Trainer and PE Teacher in Training
ISSA Elite Trainer (2023) | WABBA Level 1 Personal Trainer (2022) | SAGF Gymnastics Leader (2017)
Bhavna Goheeram is a personal trainer who holds an ISSA Elite Trainer certification and is studying to become a PE teacher. She writes and reviews the Fitness Marble guides, checking each exercise for safe, practical technique and each claim against public CDC, WHO and NHS guidance.