Published November 16, 2026 · Updated November 9, 2026 · Checked by the editor against the listed sources
Before you start: This guide is general information, not medical advice. Check with your doctor or physiotherapist first if you have osteoporosis, recent surgery, a heart condition, dizziness, or pain. If you have a recent wrist, elbow, or shoulder injury or surgery, or uncontrolled high blood pressure, ask your doctor or physiotherapist before starting wall push-ups. If you have a heart or lung condition or take medication affecting your heart rate, ask your doctor which activities suit you best. Stop and get help immediately if you feel sharp pain, chest pain, or faint.
When clients want to build upper-body strength without getting down on the floor, the wall push-up is often the first move I teach. It strengthens your chest, shoulders, and arms using your own body weight in an upright position. You can easily adjust how hard your muscles work simply by changing how far your feet stand from the wall.
Why Upper-Body Strength Matters
Public health guidelines from the CDC recommend muscle-strengthening activities on at least 2 days a week targeting all major muscle groups, including your chest, shoulders, and arms.
The National Institute on Aging (NIA) notes that strength activities help make daily tasks easier. Upper-body pushing strength can help you push up from an armchair, close a heavy door, or push a shopping trolley with confidence.
Before starting, spend a few minutes doing light arm sweeps and shoulder rolls (see our Warm-Up Exercises for Seniors).
What You Need and Setup
-
A solid wall: Use a flat, clear wall (not a door or loose panel) with a clean, non-slip floor beneath you.
-
Proper footwear: Wear flat, supportive athletic shoes.
-
Controlled pace: Take 2 seconds to lower toward the wall and 2 seconds to press away.
-
Breathing rhythm: Inhale as you bend your elbows toward the wall; exhale as you push back to the start.
How to Do a Wall Push-Up
Perform 8 to 10 repetitions for 1 to 2 sets, resting for 60 seconds between sets.
Wall Push-Up
-
Target muscles: Chest (pectoralis major), front shoulders (anterior deltoids), triceps (back of the upper arms), and core flexors.
-
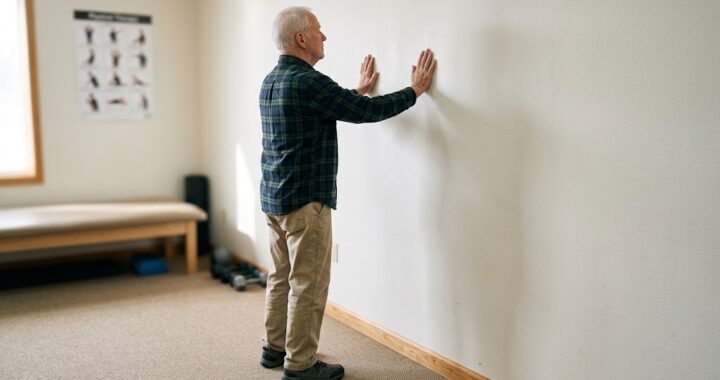
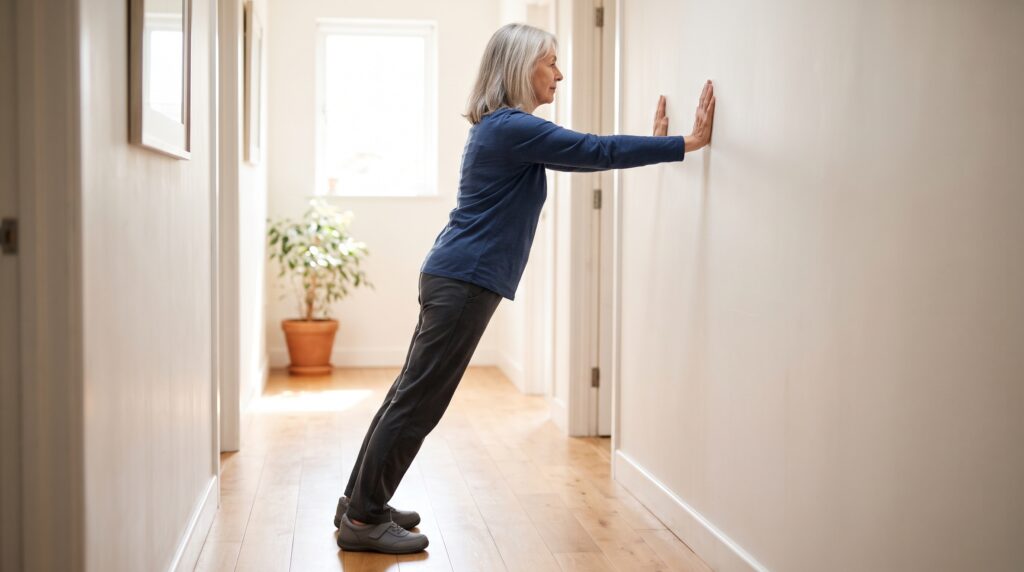
How to do it: Stand facing the wall with your feet hip-width apart. Beginners start close to the wall (see Step 1). Stepping back to about an arm’s length makes the move harder. Place your flat palms against the wall at shoulder height, slightly wider than shoulder-width apart. Keep your body in a straight line from head to heels. Inhale as you slowly bend your elbows to bring your chest toward the wall. Exhale as you smoothly press through your palms to return to the starting position.
-
Coach’s cue: “Keep your body in one straight line like a plank, and tuck your elbows at 45 degrees rather than flaring them wide.”
-
Reps/Sets: 8 to 10 repetitions, 1 to 2 sets.
-
Easier version: Stand closer to the wall and use a smaller range of motion (bending your elbows only halfway).
-
Safety check: Keep your elbows angled diagonally down at 45 degrees to protect your shoulder joints. Stop if you feel sharp wrist or shoulder pain.
-
How it should feel: Controlled, working effort across your chest, shoulders, and triceps without joint strain.
Coach’s Tips
Here is how I guide clients in my coaching sessions to protect their joints and master wall push-ups:
Essential Form Cues
-
Maintain a solid body plank: Keep your stomach gently pulled inward so your head, hips, and heels remain in a straight line.
-
Breathe with the movement: Inhale as you lower your chest toward the wall; exhale audibly as you push away.
Common Mistakes and Fixes
-
Mistake: Flaring elbows out wide in a “T” shape at shoulder height.
-
Fix: Lower your hands slightly and point your elbows down at a 45-degree angle like an arrowhead to protect your shoulder joint.
-
-
Mistake: Sagging at the hips or sticking your seat out behind you.
-
Fix: Engage your core muscles and squeeze your buttocks gently to keep your spine straight throughout the repetition.
-
-
Mistake: Shrugging shoulders up toward your ears as you lower toward the wall.
-
Fix: Pull your shoulder blades down and back before starting each repetition, keeping your neck long.
-
-
Mistake: Standing too far back on day one.
-
Fix: Start with your feet closer to the wall. Stepping your feet further back increases the weight on your arms, so add distance only when your form is completely steady.
-
How I Teach It: In my coaching sessions, the mistake I see most often is flaring the elbows straight out to the sides like a ‘T’ shape, which can pinch the front of the shoulder joint. I instruct my clients to imagine their torso and arms form an arrow shape, keeping their elbows angled down at 45 degrees as they lower toward the wall.
A 4-Step Progression Plan
Progress gradually through these steps over several weeks:
| Step | Version | When to Progress |
| Step 1 | Feet close to the wall, partial elbow bend | Start here to master body alignment |
| Step 2 | Feet close to the wall, full comfortable range | Progress after 2 weeks of 10 clean reps |
| Step 3 | Feet stepped 6 to 12 inches further back | Progress when Step 2 feels smooth and easy |
| Step 4 | Incline push-up on a sturdy kitchen counter | Progress after Step 3 feels easy for 2 full weeks |
Note: Move up to the next step only when your last repetition looks just as controlled and clean as your first.
For Step 4, use a sturdy, dry counter, wear flat non-slip shoes, and make sure the counter cannot slide. Skip this step if you feel unsteady.
Modifications for Wrist or Shoulder Comfort
If you feel mild discomfort in your wrists, try placing your palms slightly wider on the wall. If discomfort continues, stop and ask your physiotherapist. If shoulder stiffness limits your movement, review our Shoulder Mobility Exercises for Seniors to loosen the joints before practicing.
Fitting Wall Push-Ups Into Your Routine
Practice wall push-ups on 2 non-consecutive days each week to allow your muscles time to rest and adapt. Combine push-ups with leg and balance work from our Weekly Exercise Plan for Seniors: Strength & Balance. To keep your upper body balanced, pair this pushing exercise with a pulling movement like a row from our Resistance Band Exercises for Seniors.
Quick Answers
Are wall push-ups effective enough to build real upper-body strength? For beginners, wall push-ups can be a good starting point. As your muscles adapt, stepping your feet further back or transitioning to an incline counter push-up increases the resistance on your arms and chest.
How many days a week should I do wall push-ups? Two non-consecutive days a week is the CDC’s minimum for muscle strengthening. Wall push-ups work your upper body, so pair them with leg work, such as our weekly plan.
Can I practice wall push-ups every day? It is best to avoid working the same muscle groups two days in a row. Rest days give your muscles time to recover, so alternate strength days with walking, mobility work, or balance practice.
Warning Signs: When to Stop and When to See a Doctor
Stop exercising and seek emergency medical attention immediately (call your local emergency number) if you notice:
-
Chest pain, tightness, or pressure.
-
Pain spreading to your jaw, neck, back, or left arm.
-
Sudden severe shortness of breath.
-
Dizziness, lightheadedness, or feeling faint.
-
Sudden weakness, face drooping, or trouble speaking.
Book a visit with your doctor or physiotherapist if you notice:
-
Wrist, elbow, or shoulder joint pain that lasts into the next day.
-
Joint swelling or sharp pain during movement.
-
Persistent unsteadiness when standing.
Sources
Medical disclaimer: This article is for general information and education only. It is not medical advice and does not replace advice from your doctor or physiotherapist. Stop any exercise and seek medical help if you feel chest pain, dizziness, sharp pain or unusual shortness of breath.

Bhavna Goheeram — Personal Trainer and PE Teacher in Training
ISSA Elite Trainer (2023) | WABBA Level 1 Personal Trainer (2022) | SAGF Gymnastics Leader (2017)
Bhavna Goheeram is a personal trainer who holds an ISSA Elite Trainer certification and is studying to become a PE teacher. She writes and reviews the Fitness Marble guides, checking each exercise for safe, practical technique and each claim against public CDC, WHO and NHS guidance.